Kirby meets PurgeCSS
This is a walkthrough on how to set up and use PurgeCSS with a Command-line interface (CLI) or with a Graphical user interface (GUI). PurgeCSS is a tool to remove unused CSS and it can be part of your development workflow.
When you are building a website, you might decide to use a CSS framework like TailwindCSS, Bootstrap, Bulma, MaterializeCSS, Foundation, etc... But you will only use a small set of the framework, and a lot of unused CSS styles will be included.
This is where PurgeCSS comes into play. PurgeCSS analyzes your content and your CSS files. Then it matches the selectors used in your files with the ones in your content files. It removes unused selectors from your CSS, resulting in smaller CSS files.
Setup for CLI
Before we start, you need to install Node.js for the build process on your client machine. The latest version, which also includes npm (Node package manager) can be downloaded from the official Node.js website. You can test the successful installation by opening a terminal window and typing the following two commands:
Install Node
node --versionnpm --versionInstall PurgeCSS
We use a Kirby Starterkit or Plainkit to get started and create a new /purge folder in the project's root so that our folder structure looks like this:
assets
css
- css-framework.css
- content
- kirby
- site
- media
- index.php
- .htaccess
- purge
This setup is just for illustration, since purging the CSS for Starterkit or Plainkit is not ideal for demonstration. It's recommended to use PurgeCSS with "heavy" CSS frameworks that bloat your final CSS file unnecessarily.
Node.js Configuration
Also in the project's root, we create a package.json file that controls the build process. This file contains only a (build) script.
{
  "name": "projectname",
  "scripts": {
    "build": "npx purgecss -css assets/css/css-framework.css --content site/**/*.php --output purge/"
  }
}
Explanation
Use build to generate a final minified CSS file
--css assets/css/css-framework.css: input file with your framework's CSS--content 'site/**/*.php': folder to watch for CSS framework's classes--output purge/: output folder with purged CSS
If you want to customize your PurgeCSS installation, you can create an additional config file purgecss.config.js in the project root. This file will then be automatically processed at build time if it exists.
module.exports = {
  css: ['assets/css/css-framework.css'],
  content: ['site/**/*.php'],
  output: 'purge/'
}
More details on how to customize PurgeCSS can be found in the PurgeCSS docs.
Build
Now we have a fully functional basic setup and are ready to generate our purged CSS file. Make sure you are in the project root folder and start the build script as follows:
npm run buildSetup with GUI
Before we start, please make sure Prepros is installed on your local machine. You can download the free unlimited trial from the official Prepros.io website. Prepros compiles your files, transpiles your JavaScript and provides a graphical user interface like CodeKit for Mac or Scout (only SASS & SCSS).
Prepros Configuration
Make sure you add the root folder of your Kirby installation to Prepros as a new project, e.g. starterkit/ otherwise the custom commands in Prepros will not work as intended since they refer to relative paths!
Prepros will probably show an error that there are more than 2000 files for the watcher. You can ignore this warning and close the popup. Afterward, Prepros will automatically disable "Watch files for changes". Enable this setting at least for your CSS folders.
- Open Project Settings
- Navigate to CSS Tools
- Select CSS or Sass
- Scroll to Tasks
- Type the following command:
purgecss --css {{input}} --content "{{rawRootDir}}/site/**/*.php" --output {{outputDir}} {{output}}- Click on Add Custom Command
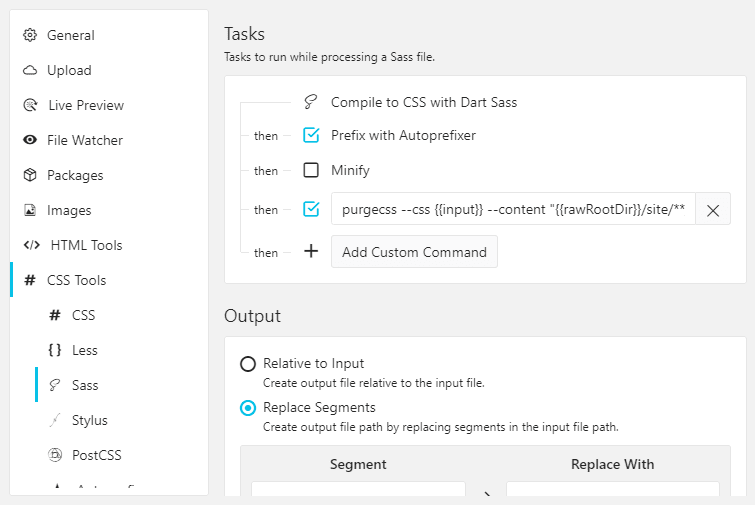
The {{output}} placeholder is required by Prepros but PurgeCSS doesn't support an explicit output path, so the {{output}} placeholder is ignored by PurgeCSS.
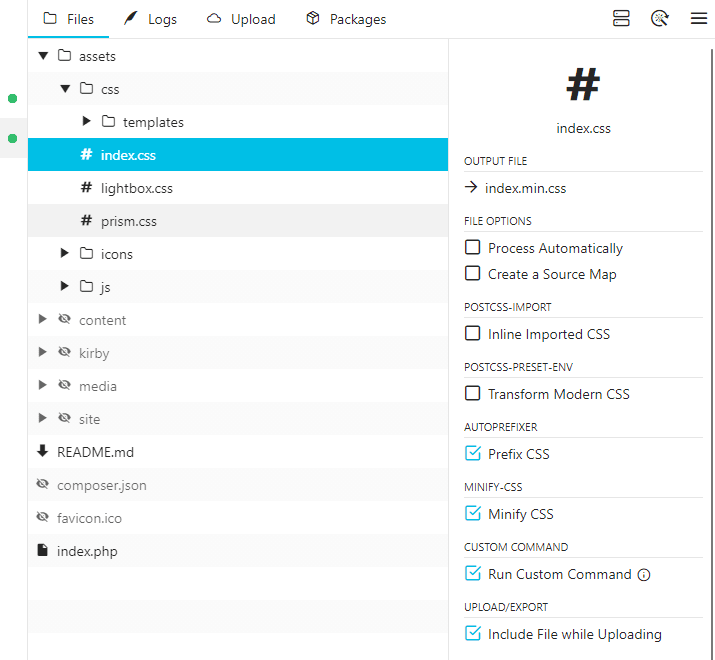
The command scans all PHP files inside the /site folder for CSS classes and writes them to the output CSS file, e.g. CSS_FRAMEWORK.min.css.
Process
When you now change the CSS/SASS/SCSS file (that includes your CSS framework), Prepros will automatically perform the custom command afterward when enabled and purge your final CSS.
All that's left to do is to add a link to this file in your HTML head tag in your header snippet (or your template).
// for CLI method use
<?= css('purge/CSS_FRAMEWORK.css') ?>

// for GUI method use
<?= css('assets/css/CSS_FRAMEWORK.min.css') ?>
To indicate which CSS selectors are safe to leave in the final output file, check out the Safelisting part in the documentation for PurgeCSS.
